Tired of your data living on a lonely single machine? Ready to let your MySQL/MariaDB server spread its wings and accept connections from anywhere on your network? Buckle up, because we’re about to embark on a playful yet technically rich journey: installing MariaDB on Ubuntu Server, creating a new database, creating and tying a user to it, and—even better—opening the gates for remote connections. By the end of this guide, you’ll be deploying your own remote-ready database faster than you can say “SELECT * FROM awesome_table.” Let’s dive in!
Why MariaDB on Ubuntu Server?
MariaDB is a community-driven fork of MySQL that often boasts better performance and open-source licensing. On top of that, Ubuntu Server (version 24.04 LTS in our examples) is rock-solid, well-supported, and, frankly, an ideal platform for server tasks. Whether you’re building a home lab, standing up a development environment, or provisioning production servers, the combination of Ubuntu Server 24.04 LTS + MariaDB 10.11 (or later) is a match made in sysadmin heaven.
Let’s break the adventure into bite-sized steps:
- Installing MariaDB
- Enabling & starting MariaDB as a system service
- Securing the root account
- Creating a database with UTF8MB4 character set
- Creating a dedicated user and granting privileges
- Configuring remote access
- Adjusting the firewall
- Testing your remote connection
Get ready to become a certified “DB Wrangler” in under a thousand words!
- Installing MariaDB
First things first: update packages and install MariaDB Server. Fire up your Ubuntu Server’s terminal (or SSH session) and run:
sudo apt update && sudo apt upgrade -y
sudo apt install mariadb-server -y
sudo apt update && sudo apt upgrade -yrefreshes package lists and applies updates.sudo apt install mariadb-server -yinstalls the MariaDB Server packages non-interactively.
Once installation completes, you’ll have MariaDB binaries and initial configuration files placed under /etc/mysql/. Congratulations—you’ve laid the foundation for your future database empire.
- Enabling & Starting MariaDB as a System Service
On Ubuntu Server, the MariaDB daemon is managed by systemd. To ensure MariaDB starts automatically at boot (so your databases come to life on every reboot), execute:
sudo systemctl enable mariadb
sudo systemctl start mariadb
sudo systemctl enable mariadbtells systemd to launch MariaDB at every startup.sudo systemctl start mariadbstarts the MariaDB service right now.
Verify that MariaDB is running with:
sudo systemctl status mariadb
If you see “active (running)”, you’re in business.
- Securing the Root Account
By default, the root account for MariaDB is bound to localhost and might not have a strong password. For security reasons, let’s set (or reset) the root password. Log into MariaDB as root:
sudo mysql -u root
Since this is a fresh install, you can press Enter at the password prompt if none exists yet. Once you’re at the MariaDB [(none)]> prompt, run:
ALTER USER 'root'@'localhost' IDENTIFIED BY 'YourNewStrongPassword';
FLUSH PRIVILEGES;
- Replace
YourNewStrongPasswordwith a robust, unpredictable password. FLUSH PRIVILEGES;tells MariaDB to reload privilege tables so your password change takes effect immediately.
Type EXIT; to leave the MariaDB prompt.
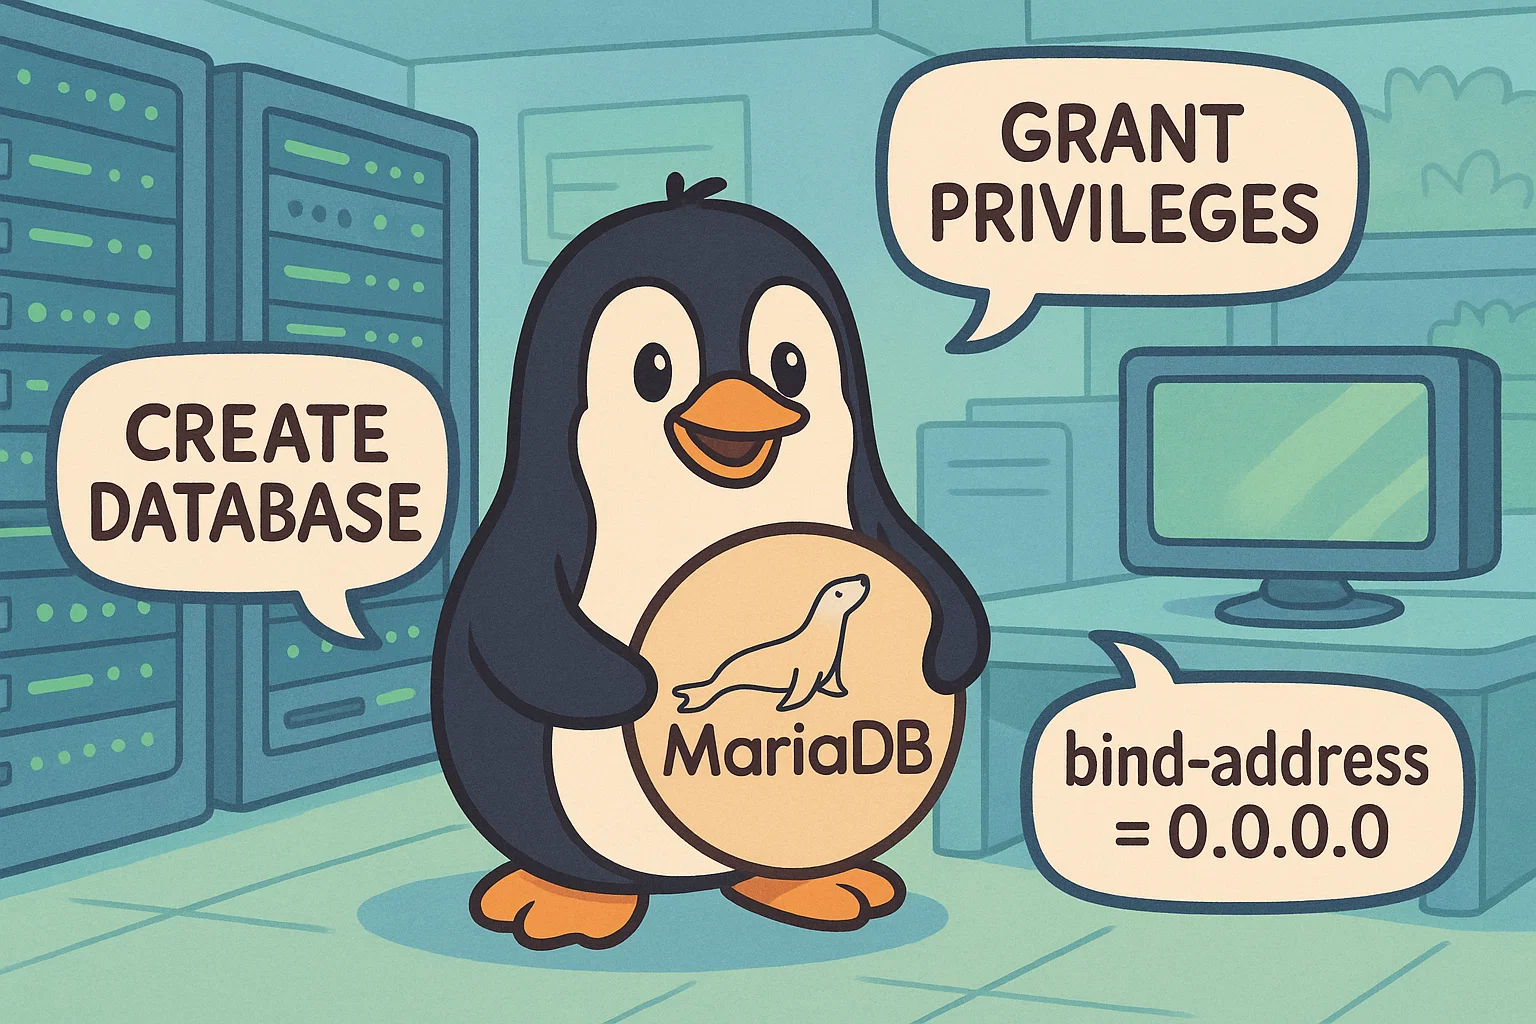
- Creating a Database with UTF8MB4
Now that root is locked down, let’s create a new database optimized for modern text. In MariaDB 10.11+, UTF8MB4 is THE way to go if you plan to support emojis, multi-language data, or any other extended-character text. Reconnect as root:
sudo mysql -u root -p
Enter your root password, then run:
CREATE DATABASE fabulous_db
  CHARACTER SET = utf8mb4
  COLLATE = utf8mb4_unicode_ci;
fabulous_dbis our chosen name—feel free to swap it for something more “you.”CHARACTER SET = utf8mb4ensures the database can store 4-byte Unicode (including emojis!).COLLATE = utf8mb4_unicode_ciprovides case-insensitive sorting that works across languages.
Type EXIT; to leave the MariaDB prompt again. You’ve made your first database—nice work!
- Creating a Dedicated User & Granting Privileges
In real-world setups, you should never connect to databases with the root account. Instead, create a less privileged user. Reconnect as root once more:
sudo mysql -u root -p
After entering the password, run:
CREATE USER 'dbuser'@'localhost' IDENTIFIED BY 'SimpleButNotTooSimple123';
GRANT ALL PRIVILEGES ON fabulous_db.* TO 'dbuser'@'localhost';
FLUSH PRIVILEGES;
CREATE USER 'dbuser'@'localhost' IDENTIFIED BY 'SimpleButNotTooSimple123';creates a user nameddbuserwho can only connect fromlocalhost.GRANT ALL PRIVILEGES ON fabulous_db.* TO 'dbuser'@'localhost';allowsdbuserto do anything insidefabulous_db(SELECT, INSERT, UPDATE, DELETE, etc.).FLUSH PRIVILEGES;reloads the grant tables, so MariaDB recognizes the new user and permissions instantly.
Type EXIT; again to leave.
- Configuring Remote Access
By default, MariaDB only listens on 127.0.0.1 (localhost), meaning remote connections are blocked. To allow other machines on your network (or, if you dare, from the internet) to reach your database, we’ll update the MariaDB configuration.
Important Security Note: Exposing MariaDB to the internet without additional safeguards (firewalls, SSL/TLS encryption, fail2ban, and strong passwords) is risky. Use remote access sparingly and only behind proper network controls.
a. Edit the Configuration File
On Ubuntu Server 24.04 LTS with MariaDB 10.11, the main server configuration lives in:
/etc/mysql/mariadb.conf.d/50-server.cnf
Open it with your favorite text editor as root. For example:
sudo nano /etc/mysql/mariadb.conf.d/50-server.cnf
Inside that file, locate the line:
bind-address = 127.0.0.1
Change it to:
bind-address = 0.0.0.0
This instructs MariaDB to listen on all network interfaces. Save and exit (in Nano, that’s Ctrl-O, Enter, Ctrl-X).
b. Restart MariaDB
Apply the configuration change:
sudo systemctl restart mariadb
c. Grant Remote Privileges to Your User
Now reconnect as root:
sudo mysql -u root -p
Enter the password, then run:
GRANT ALL PRIVILEGES ON fabulous_db.* TO 'dbuser'@'%' IDENTIFIED BY 'SimpleButNotTooSimple123';
FLUSH PRIVILEGES;
- Using
'dbuser'@'%'means this user can connect from ANY host (replace%with a specific IP or subnet for better security, e.g.,'192.168.1.%'). - The password after
IDENTIFIED BYshould exactly match the one you set earlier fordbuser. FLUSH PRIVILEGES;once again ensures those new remote permissions take effect.
Type EXIT; to finish.
- Adjusting the Firewall
Even if MariaDB is listening on all interfaces, your Ubuntu Server’s firewall (UFW by default) will likely block port 3306, which is MariaDB/MySQL’s standard port. Let’s open it:
sudo ufw allow 3306/tcp
sudo ufw reload
sudo ufw allow 3306/tcpallows incoming TCP connections on port 3306.sudo ufw reloadrefreshes UFW rules.
Tip: If you only want to allow a specific IP (e.g., 203.0.113.5), use:
sudo ufw allow from 203.0.113.5 to any port 3306 proto tcp
Otherwise, any machine on the internet could hammer your MariaDB instance—so consider carefully!
- Testing Your Remote Connection
You’re almost at the finish line. Grab another computer on the same network (or a remote client if you configured your router/NAT correctly) and install a MySQL/MariaDB client or use the MySQL command-line tool. For example, on a Linux workstation:
sudo apt install mysql-client -y
mysql -u dbuser -p -h  fabulous_db
- Replace
<server_ip_or_hostname>with your Ubuntu Server’s IP or DNS name. - When prompted for a password, type
SimpleButNotTooSimple123.
If everything is configured correctly, you’ll see a MariaDB [fabulous_db]> prompt. Try a quick query:
SHOW TABLES;
You should see an empty list (no tables created yet), confirming that remote access works!
Keep It Fun: A Quick Joke Break
Why did the database admin go broke?
Because he lost his keys!
(Seriously, back up your keys/passwords in a password manager so you never lose them. Unlike our pun-loving colleague above.)
Tips, Best Practices & Common Pitfalls
- Use Strong Passwords:
Avoid settingdbuser’s password to something like “password123.” Use a passphrase or a generated password to fend off brute-force attempts. - Limit Remote Hosts:
Instead ofGRANT … TO 'dbuser'@'%', specify an IP or subnet—e.g.,'dbuser'@'192.168.1.%'—to minimize exposure. - Backup Regularly:
Always runmysqldumpor a scheduled backup routine. A remote hack or a misplaced DROP TABLE command can ruin your day. - Consider SSL/TLS Encryption:
If you absolutely need MariaDB open to the internet, configure SSL certificates and force clients to connect via encrypted channels. Otherwise, unencrypted credentials and data could be sniffed on the wire. - Keep Software Up to Date:
Periodically runsudo apt update && sudo apt upgrade -yto apply security patches. - Disable Remote Access if Unnecessary:
If you only needed remote access temporarily, revertbind-addressback to127.0.0.1and remove the UFW rule:sudo nano /etc/mysql/mariadb.conf.d/50-server.cnf # Change bind-address back to 127.0.0.1, then: sudo systemctl restart mariadb sudo ufw delete allow 3306/tcp
A Quick Recap
- Step 1:
sudo apt install mariadb-server -y - Step 2:
sudo systemctl enable mariadb && sudo systemctl start mariadb - Step 3:
sudo mysql -u root→ALTER USER 'root'@'localhost' IDENTIFIED BY 'YourNewStrongPassword'; FLUSH PRIVILEGES; - Step 4:
CREATE DATABASE fabulous_db CHARACTER SET utf8mb4 COLLATE utf8mb4_unicode_ci; - Step 5:
CREATE USER 'dbuser'@'localhost' IDENTIFIED BY 'SimpleButNotTooSimple123'; GRANT ALL PRIVILEGES ON fabulous_db.* TO 'dbuser'@'localhost'; FLUSH PRIVILEGES; - Step 6: Edit
/etc/mysql/mariadb.conf.d/50-server.cnf, setbind-address = 0.0.0.0, thenGRANT ALL PRIVILEGES ON fabulous_db.* TO 'dbuser'@'%' IDENTIFIED BY 'SimpleButNotTooSimple123'; FLUSH PRIVILEGES; - Step 7:
sudo ufw allow 3306/tcp - Step 8: From a remote client:
mysql -u dbuser -p -h <server_ip> fabulous_db
Voilà! In about ten minutes, you have a secure MariaDB server that welcomes connections from afar—your data now flies free across your network. High five!