As the person responsible for our company’s IT infrastructure, one of my essential tasks was optimizing our web servers. After much research, testing, and consideration, Nginx emerged as the optimal solution due to its high performance, reliability, and flexibility.
Understanding Nginx Architecture and Working Model
One aspect that immediately attracted me to Nginx was its highly efficient architecture. Unlike Apache’s thread-based approach, Nginx uses a Master-Worker architecture.
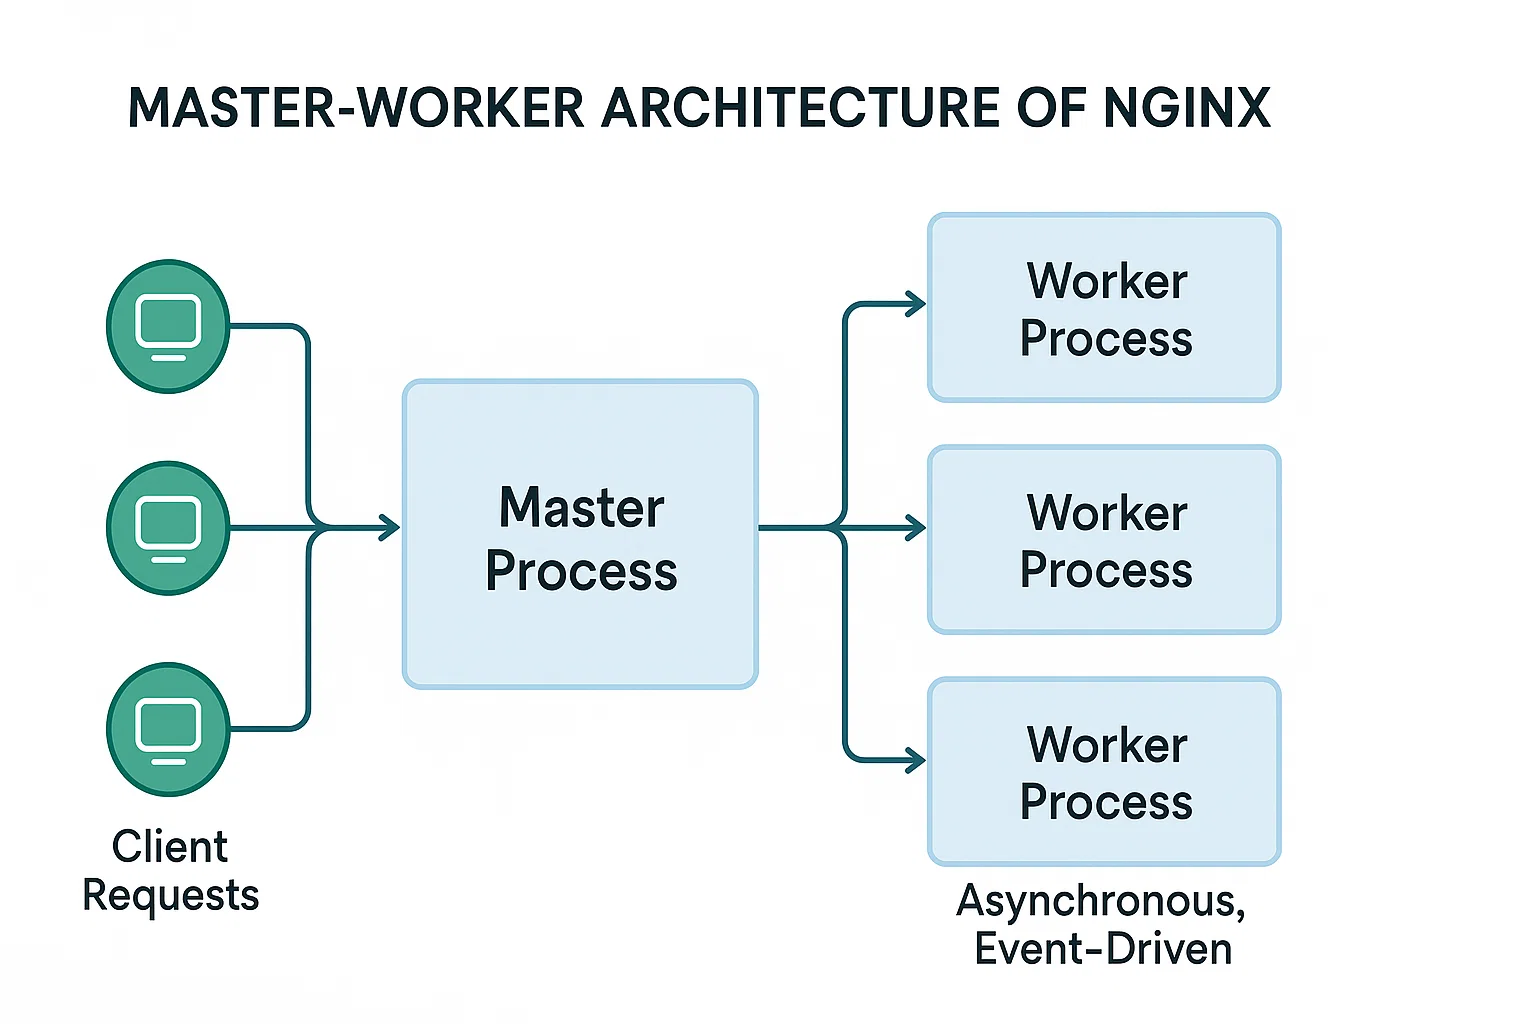
Master and Worker Processes
The Master process manages global operations: reading configurations, launching worker processes, and overseeing their health. Each Worker process, operating independently, handles client requests using an event-driven model, efficiently managing multiple connections with minimal resource usage.
Event-Driven Asynchronous Model
Worker processes employ a non-blocking, event-driven model, ensuring quick request handling and significantly reduced latency. This is especially beneficial under heavy traffic loads, maintaining stability and efficiency.
Installing Nginx on Ubuntu
Here’s exactly how I installed Nginx on our Ubuntu servers:
sudo apt update
sudo apt install nginx -y
After installation, I quickly confirmed everything was correct by running:
sudo systemctl start nginx
sudo systemctl enable nginx
nginx -t
This ensured Nginx started correctly and would auto-start upon reboot.
Useful Nginx Commands and Signals
Managing Nginx effectively required familiarity with some crucial commands:
- Configuration Testing: Verify your configuration syntax and setup:
nginx -t - Start/Stop/Reload:
sudo systemctl start nginx sudo systemctl stop nginx sudo systemctl reload nginx - Signals for Process Management:
- Stop immediately:
nginx -s stop - Graceful quit:
nginx -s quit(finishes current requests) - Reload config without downtime:
nginx -s reload - Reopen logs:
nginx -s reopen
- Stop immediately:
Smoothly Upgrading Nginx on Ubuntu
Ensuring no downtime during an upgrade was critical. Here’s how I smoothly upgraded Nginx:
- Downloaded and unpacked the latest stable Nginx version:
wget https://nginx.org/download/nginx-1.24.0.tar.gz tar xf nginx-1.24.0.tar.gz cd nginx-1.24.0 - Configured and compiled new version:
./configure --prefix=/etc/nginx make - Replaced the Nginx binary safely:
sudo mv /usr/sbin/nginx /usr/sbin/nginx.old sudo cp objs/nginx /usr/sbin/nginx - Sent upgrade signal without downtime:
sudo kill -USR2 $(cat /var/run/nginx.pid)
sudo kill -WINCH $(cat /var/run/nginx.pid.oldbin)
sudo kill -QUIT $(cat /var/run/nginx.pid.oldbin)
This process gracefully transitioned users to the new version without interrupting active connections.

Final Thoughts and Results
Since switching to Nginx, I’ve witnessed remarkable improvements: lower CPU and RAM usage, better load handling, and easier management. The investment in learning Nginx’s nuances paid off significantly in operational efficiency.
If you’re looking for a robust, reliable web server solution for your Ubuntu setup, I confidently recommend giving Nginx a try.